

How to Set Up a Wireless In-Ear Monitor System
You've got the wireless IEM system. Now you need to actually get it running. Whether you're a church tech volunteer setting up your first system the week before a fall series launch or a live production engineer onboarding a new rig at a touring venue, the setup process is the same: signal chain first, RF coordination second, mix configuration third. After helping hundreds of churches and live production teams get their IEM systems running right the first time, here's exactly how to do it, step by step, with no guesswork.
SoundPro's specialists configure wireless IEM systems for churches and live venues every week. 16+ industry certifications, real answers fast.
- What You Need Before You Start
- Understanding the Signal Chain
- Step 1: RF Frequency Scan and Coordination
- Step 2: Physical Setup and Cable Connections
- Step 3: Configure Your Console's Aux Sends
- Step 4: Set Transmitter Input Gain
- Step 5: Sync Bodypacks to the Transmitter
- Step 6: Fit the Earphones and Check Isolation
- Step 7: Build the Monitor Mix
- Setting Up Multi-Channel Systems (4+ Performers)
- Troubleshooting Common IEM Setup Problems
- Next Steps
- FAQ
What You Need Before You Start
Before anything gets plugged in, confirm you have every component in the chain. A wireless IEM system has four parts: the transmitter, the bodypack receiver, the earphones, and the audio source (your console). You also need a few pieces of supporting hardware that are easy to overlook until you're mid-setup without them.
| Component | What It Does | Notes |
|---|---|---|
| Wireless IEM transmitter | Takes console aux output and broadcasts the mix wirelessly | Typically half-rack; XLR or combo inputs |
| Bodypack receiver | Worn by performer; receives transmitter signal and outputs to earphones | Confirm battery type and bring spares |
| IEM earphones | Delivers the mix directly to the performer's ears | Included in most systems; upgrade recommended |
| XLR cables (2) | Connect console aux output to transmitter inputs (L + R) | One for mono, two for stereo setup |
| Digital console with aux sends | Source of the monitor mix signal | One dedicated aux bus per performer |
| Rack space or surface mount position | Transmitter needs a stable home with clear antenna sightlines | Most transmitters are 1U; avoid mounting inside closed racks |
| Fresh batteries or charging station | Powers the bodypack receiver | Most professional systems run on AA; rechargeable packs available |
Understanding the Signal Chain
Before you touch a knob, you need to understand where the audio goes. Every step in the setup process maps to one link in this chain. When something goes wrong, knowing the signal flow tells you exactly where to look.
The path is: Console aux send → XLR cable → Transmitter input → RF broadcast → Bodypack receiver → Earphone output → Performer's ears.
Every adjustment you make, whether it's gain staging, mix building, or troubleshooting a dropout, traces back to one of these links. Keep this chain in mind throughout the setup process and you will always know where to look when something sounds wrong.
"Most IEM setup problems aren't hardware failures. They're signal chain problems: a gain stage set incorrectly, an aux send accidentally assigned post-fader when it should be pre, or a bodypack volume pushed to maximum to compensate for a weak mix at the source. Follow the chain and you will find the problem."
Step 1: RF Frequency Scan and Coordination
This is the step most people skip, and it's the reason they have dropouts. RF coordination means finding clean, unused frequencies in your specific venue before you assign transmitter channels and sync bodypacks. Do this before anything else, and do it with all your other wireless systems active, including microphones, guitar transmitters, camera links, and any IEM systems already in the room.
Turn off all IEM transmitters
You want the bodypack receiver scanning the room's actual RF environment, not its own transmitter's signal. Power down transmitters first, then run the scan from the bodypack or use the transmitter's built-in scan mode, which varies by system.
Run the auto-scan from the performer position
Both the Shure PSM 300 and Sennheiser EW IEM G4 have built-in auto-scan functions. Initiate the scan from where the performer will stand on stage — not from the FOH position. RF conditions change significantly across a room, and antenna placement matters. The scan will identify the cleanest available frequencies in your band.
Assign and document frequencies
Select a clean frequency from the scan results and lock it in. Write it down. For multi-channel systems, maintain at least 400kHz of separation between IEM channels, and keep your IEM frequencies in a different part of the UHF band from your wireless microphone frequencies when possible. This prevents intermodulation, which is the most common source of interference in multi-channel wireless setups.
Step 2: Physical Setup and Cable Connections
Transmitter placement and antenna orientation are where a lot of setups quietly underperform. The antenna on your IEM transmitter needs an unobstructed line of sight to the bodypack. A transmitter stuffed inside a fully closed equipment rack, surrounded by metal panels and power supplies, will drop signal even in a small room.
- Mount the transmitter in a rack with the antennas pointing up and clear. If the transmitter is in a case, the antennas need to clear the top of the rack. Half-rack units can be placed on shelves; full-rack units sit in standard 1U rack spaces.
- Orient antennas vertically. For a single transmitter with two antennas, angle them slightly apart (roughly a 45-degree V) rather than perfectly parallel. This reduces signal null zones as the performer moves across the stage.
- Keep transmitters away from power amplifiers and digital processing gear. These generate RF noise that can degrade your wireless signal even if they're not in the same frequency band.
- For larger setups (3 or more IEM channels), use a remote antenna distribution system. This lets you position a single pair of high-gain antennas at the front edge of the stage for maximum coverage, and run coax cable back to the transmitter rack at FOH.
Once the transmitter is positioned, connect your two XLR cables from the console's aux outputs to the transmitter's left and right inputs. Most IEM transmitters have balanced XLR or combo (XLR/TRS) inputs. Run balanced connections wherever possible; they reject noise over long cable runs.
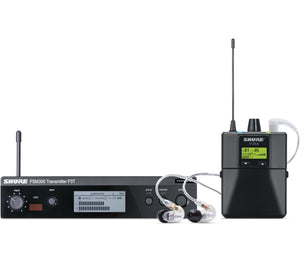
The PSM 300 is the benchmark professional wireless IEM system for churches and working musicians. One-touch frequency scan and infrared sync keep setup fast for volunteer-run booths. The half-rack transmitter mounts cleanly in any standard rack, and the bodypack's MixMode lets performers blend two console inputs into a personal mix on the fly, without involving the engineer.
Shop at SoundPro →Step 3: Configure Your Console's Aux Sends
This is the most technically important step in the entire setup process, and it's where most systems get misconfigured during the first installation. Each performer's IEM mix originates as a dedicated aux send or mix bus from your digital console. Getting this routing right determines everything that follows.
Assign one aux bus per performer
On your console, navigate to the aux/bus assign section and create a dedicated bus for each performer who needs an IEM mix. Label them clearly: "Worship Leader IEM," "Drummer IEM," "Keys IEM." This is critical in a multi-service church environment where different volunteers may be running the console each week.
Pre-fader vs. post-fader: which to use
This is a fundamental IEM routing decision with real consequences. Pre-fader sends mean the performer's monitor mix is independent of the main PA faders: if the engineer brings up the house level during a service, it doesn't change what the performer hears. This is the right choice for most IEM setups. Post-fader sends track the main faders, which is useful in specific scenarios (matching a recording mix to the house) but typically not what you want for stage monitoring.
Set the aux bus output level
Route your labeled aux bus to a physical XLR output on the console's rear panel or stage box. Note the output number. This is the cable that runs to your IEM transmitter input. Set the console's aux output level to the unity gain position to start (typically 0dB on most digital consoles) before adjusting at the transmitter.
SoundPro's specialists set up IEM systems for churches and live production teams every week. If your console routing or RF coordination needs an expert eye, we're here.
Step 4: Set Transmitter Input Gain
With your console's aux output connected to the transmitter input via XLR, the next job is setting the transmitter's input gain so the signal peaks in the right range. Too low and the performer can't hear their mix clearly without cranking the bodypack to its ceiling, which introduces noise. Too hot and the signal clips inside the transmitter, creating distortion that's extremely unpleasant to hear in earphones at close range.
- Play audio through your console with all channels at their normal working levels (run a soundcheck, not silence).
- Watch the input level meter on the transmitter display. You want the signal peaking in the green, occasionally touching yellow, and never reaching red.
- Adjust the transmitter's input gain trim until this range is consistently achieved at normal operating levels.
- Lock the transmitter's gain once set, if your system supports a lock function, to prevent accidental adjustment during performance.
On the Shure PSM 300, the transmitter's input gain is adjusted via the front panel menu. On the Sennheiser EW IEM G4, it's accessible through the OLED display. Both systems display input level in real time, making it straightforward to set correctly without metering software.
Step 5: Sync Bodypacks to the Transmitter
Modern professional IEM systems use infrared sync to pair the bodypack receiver to the transmitter with a single button press. This eliminates the manual frequency entry that older systems required and dramatically reduces setup time for multi-channel rigs.
Power on the transmitter and set your assigned frequency
Navigate to the frequency you identified during your RF scan in Step 1 and set it on the transmitter. Confirm the transmitter is transmitting (the RF output indicator should be active).
Initiate infrared sync on the bodypack
Hold the bodypack's front IR port directly in front of the transmitter's IR sync port (typically on the front panel). Press and hold the sync button on the bodypack until the display confirms sync is complete. The bodypack will automatically lock to the transmitter's frequency and any other settings (like HDX companding on the Sennheiser) that need to match.
Confirm signal reception
With the bodypack synced and earphones plugged in, set the bodypack volume to 50% and confirm you can hear audio from the console. Play something through the channel you've routed to this IEM aux bus. A clean, noise-free signal confirms the sync is successful. RF signal strength should display as strong at this close range; note it for comparison once the performer is at their normal stage position.
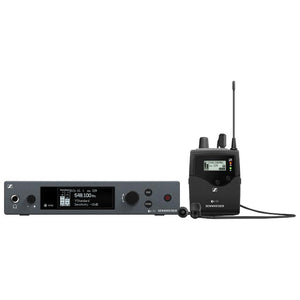
The EW IEM G4 is Sennheiser's professional workhorse for churches and touring productions. Up to 1,680 tunable UHF frequencies, IR sync that links up to 12 bodypacks per channel, and an OLED display that shows input level and RF status at a glance. The full-metal transmitter housing is built for real-world stage use, and the HDX companding delivers transparent audio quality in a demanding live environment.
Shop at SoundPro →Step 6: Fit the Earphones and Check Isolation
A proper acoustic seal is not a preference. It is the mechanical foundation of the entire IEM monitoring experience. An earphone that doesn't seal correctly leaks stage noise into the performer's ears (raising the listening volume they need to hear their mix) and leaks their mix outward (creating bleed in recording environments). Every other step in this guide is undermined by a poor fit.
Over-ear cable routing
For earphones with detachable cables (like the Shure SE215 Pro), always route the cable over the ear before inserting the earphone tip into the canal. The over-ear fit locks the earphone's position, reduces cable handling noise, and prevents the earphone from working loose during a high-energy performance. Most professional IEMs are designed specifically for over-ear use and feel awkward worn straight-down — that's by design.
Tip selection and the tug test
Insert the earphone tip, then gently tug the cable. The earphone should stay firmly in place with no movement. If it loosens or shifts, try a larger tip size or switch to foam tips, which conform to the ear canal shape and typically provide 5 to 8dB more isolation than equivalent silicone tips. Foam tips are worth using for every performance.
The isolation check
With both earphones seated and sealed, the performer should be able to hear a voice at normal speaking volume in the room but it should sound noticeably muffled. If the room sounds nearly as loud as normal, the seal is not made. Full acoustic isolation is what lets performers hear their mix at safe volumes without cranking the bodypack to its ceiling.
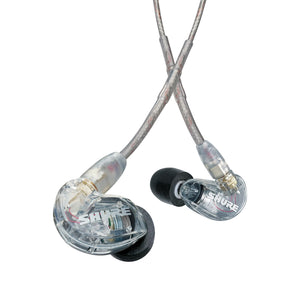
The SE215 Pro is the standard professional earphone upgrade for worship teams and live production musicians stepping up from the earphones included with wireless IEM systems. Up to 37dB of passive isolation, a single dynamic driver, and a detachable MMCX cable (so a cable failure is a $20 fix, not a $100 replacement). The over-ear fit locks in securely from soundcheck through the last song.
Shop at SoundPro →Step 7: Build the Monitor Mix
This is where the setup becomes an art form, and it's the step most new IEM users need the most guidance on. The house PA mix is tuned for a reverberant room full of people at a distance. Played back through close-fitting earphones, it sounds congested, hyped in the low-mids, and overwhelming. A monitor mix for IEMs needs to be built from scratch with a completely different philosophy.
Start from zero and build up
On the performer's dedicated aux bus, start with all faders at zero. Ask the performer what they need most to stay locked in: usually their own voice or instrument first, then the click (if applicable), then the rhythm section, then supporting instruments. Build up from that foundation rather than starting with the full house mix and trying to adjust it down.
IEM mix priorities by performer role
| Performer | Priority 1 | Priority 2 | Priority 3 |
|---|---|---|---|
| Worship leader / lead vocalist | Own vocal (direct, present) | Piano or acoustic guitar | Kick and bass for tempo |
| Drummer | Click track | Kick and snare returns | Bass and vocals |
| Bassist | Kick drum | Own instrument | Vocals for cues |
| Keys | Own instrument | Vocals and chord cues | Kick and bass for tempo |
| Guitarist | Own instrument | Vocals | Kick for tempo |
| Pastor (spoken word) | Room ambient mic | Own voice (subtle) | Music blend for transitions |
Critical mix adjustments for IEM listening
- Reduce reverb on the monitor bus. Reverb that sounds natural in the room sounds washed out in earphones. Pull any room reverb sends down on the monitor aux, or use a separate reverb return at a much lower level than the house.
- Add gentle bus compression. A 2:1 to 4:1 compressor with a medium attack on the monitor bus smooths out dynamic swings that would otherwise be jarring in close-listening earphones. Most digital consoles have a bus compressor built in.
- Roll off low-frequency buildup. Kick drum and bass frequencies build up quickly in a closed-ear environment. A gentle high-pass filter on the monitor bus at 80 to 100Hz cleans this up without removing the low-end presence performers need.
- Add an ambient mic. This is one of the highest-impact additions to any IEM system. A small omnidirectional microphone at the front edge of the stage blended lightly into each performer's mix restores the sense of room, congregation energy, and ambient presence that full isolation removes. Without it, many performers feel disconnected from the space. With it, IEMs feel natural from day one.
"The single thing that makes the most difference in how performers feel about their IEM system is the ambient microphone. It's a $50 omnidirectional mic blended at about -10dB. Performers who were reluctant to give up wedges become converts the first time they hear the congregation in their ears. Add it every time."
Setting Up Multi-Channel Systems (4+ Performers)
When multiple performers are all running wireless IEMs simultaneously, a few additional setup steps become critical for reliable, interference-free operation.
Coordinate all wireless systems together
Multi-channel wireless setups — IEMs plus wireless mics plus guitar/instrument links — need all frequencies coordinated as a single system, not independently. Use the frequency management software available for your platform (Shure Wireless Workbench for Shure systems, Sennheiser Wireless Systems Manager for Sennheiser) to run a coordinated scan and get a frequency plan that ensures adequate separation across every active wireless channel in your venue.
Consider an antenna distributor
For 3 or more IEM transmitters, an antenna distribution system replaces the individual antennas on each transmitter with a single pair of high-gain antennas positioned optimally for stage coverage. This dramatically reduces the RF clutter of multiple transmitter antennas competing at FOH or at a stage rack, and improves overall signal reliability across all channels simultaneously.
Document everything
Create a one-page IEM system runsheet that captures every performer's transmitter frequency, bodypack volume setting, console aux bus assignment, and console output connection. Post it at the sound booth. When a different volunteer runs the system next Sunday, this document is the difference between a smooth service and 20 minutes of troubleshooting during worship. Update it every time a frequency is changed.
Troubleshooting Common IEM Setup Problems
These are the issues SoundPro's specialists hear about most often after a new installation, and every one of them has a straightforward fix once you know where to look.
- No audio in the earphones. Check the signal chain from the start: is the console aux bus outputting signal? Is the XLR connected to the correct output on the console and the correct input on the transmitter? Is the transmitter transmitting (RF indicator active)? Is the bodypack synced and the volume above zero? Is the earphone cable fully seated in the bodypack output jack? Work through the chain in order.
- Audio cuts in and out (dropouts). RF interference is the most common cause. Confirm your frequency isn't conflicting with another wireless system active in the room. Check antenna placement, specifically confirming the antennas have line of sight to the performer's stage position and aren't blocked by metal obstacles. Verify that the bodypack battery is adequately charged.
- Mix sounds hollow, harsh, or fatiguing. The monitor mix is likely carrying too much room reverb, too much low-frequency buildup, or is sourcing from the house mix rather than a dedicated monitor bus. Build a fresh monitor mix from scratch as described in Step 7.
- Performer has to crank bodypack to maximum to hear clearly. The problem is at the source, not the bodypack. The console aux send level or the transmitter input gain is set too low. Go back to Step 4 and reset the transmitter input gain with audio running at actual service levels.
- Static or noise when not playing. Usually an RF interference issue or a ground loop between the console and transmitter. Try a different frequency first. If the noise persists, use a balanced DI or ground lift on the console output connection to the transmitter.
- Performer's own voice sounds strange or hollow. This is called the occlusion effect: the sealed earphone changes how bone-conducted sound (your own voice) resonates in your skull. It's especially pronounced when a performer sings without a strong vocal in their monitor mix. Pull up the performer's direct vocal channel in their IEM mix. The effect reduces significantly when the mix reinforces what they're naturally hearing.
Next Steps
Getting your wireless IEM system running correctly the first time is the foundation. Here's where to go from here.
- Create your runsheet and document everything. Before the first service or show using the new system, record every frequency, bus assignment, and gain setting in a printed document. Laminate it. Post it at FOH. Operational consistency starts with documentation.
- Do a proper soundcheck before going live. Run the complete IEM system at actual service or show levels, with all performers in their stage positions, before the first real event. Confirm RF signal strength from every stage position, get each performer's mix dialed to their satisfaction, and run through at least one full song before the room fills.
- Train every volunteer who will operate the system. Walk each operator through the full setup process and the troubleshooting checklist. Explain the runsheet. A well-documented, well-trained volunteer team runs a complex wireless IEM system reliably every week. SoundPro's Account Managers can support this training as part of the purchase process.
- Plan your next channel. Once the first performer is on IEMs and experiencing a personal monitor mix, the rest of the team usually wants one within a few months. Build your initial system with expansion in mind: coordinated frequencies, enough console buses, and a rack with room for additional transmitters.
- The Complete In-Ear Monitor Guide: Systems, Earphones, and Setup for Churches and Live Production
- Best Digital Mixer for Church: Recommendations by Size and Budget
- Wireless IEM Systems at SoundPro
- Shure PSM 300 at SoundPro
- Sennheiser EW IEM G4 at SoundPro
- Shure SE215 Pro Earphones at SoundPro
Get a custom quote from SoundPro's certified specialists. We'll match the right system to your console, venue, and RF environment.
FAQ: Setting Up a Wireless In-Ear Monitor System
How do you set up a wireless IEM system from scratch?
Start with RF coordination: scan your venue for clean frequencies with all other wireless gear active, assign those frequencies to your transmitters, and document them. Then connect your console's aux outputs to the transmitter via XLR, set the transmitter input gain with audio running at normal levels, and sync the bodypack via infrared. Fit the earphones with a proper acoustic seal, build a dedicated monitor mix from scratch (not a copy of the house mix), and run a full soundcheck before going live. The complete step-by-step process is covered in this guide above.
What is the difference between pre-fader and post-fader monitor sends?
A pre-fader send delivers the performer's monitor mix independently of the main PA fader. If the engineer adjusts the house PA level, it has no effect on what the performer hears in their IEMs. A post-fader send tracks the main fader, so changes to the house mix affect the monitor mix simultaneously. For IEM monitoring in most live and church applications, pre-fader sends are the correct choice. They give each performer a stable, consistent mix regardless of what the engineer is adjusting in the house.
How do I avoid RF interference with multiple wireless IEM systems?
Coordinate all wireless frequencies (IEMs, wireless mics, guitar links) as a single system using auto-scan tools built into your hardware, or using Shure Wireless Workbench or Sennheiser Wireless Systems Manager software. Maintain at least 400kHz separation between IEM channels, place IEM frequencies in a different portion of the UHF band from wireless mics, and use an antenna distribution system for 3 or more simultaneous IEM transmitters. Run all coordination with every wireless system active in the room to get an accurate picture of what frequencies are available.
Why does my IEM mix sound hollow or strange compared to the house mix?
The house PA mix is designed for a large room full of people at distance. In close-fitting earphones, the same mix sounds congested, overly reverberant, and low-mid heavy. IEM monitor mixes need to be built separately: reduce reverb sends on the monitor bus, apply gentle bus compression to smooth dynamic swings, roll off low-frequency buildup with a gentle high-pass filter, and pull up the performer's own voice or instrument so they can hear themselves clearly. Adding an ambient microphone to restore room and audience presence also makes a significant difference in how natural IEMs feel.
How loud should the bodypack volume be set?
Start at 50% and have the performer adjust to their preferred listening level. If a performer needs to push the bodypack to maximum to hear their mix, the problem is upstream: either the console aux send level is too low or the transmitter input gain needs adjustment. The goal is for the performer to have comfortable listening volume at 50 to 70% bodypack output with the remaining range as headroom. Performers who consistently push bodypacks to maximum are exposing themselves to elevated volume levels over the course of long services or rehearsals.
Do I need an ambient microphone with my IEM system?
You don't need one, but it's one of the highest-return additions you can make. Full acoustic isolation removes the natural connection to the room that performers have always relied on for energy, timing cues, and audience awareness. A small omnidirectional microphone placed at the front of the stage, blended lightly into each performer's IEM mix, restores that ambient connection. Many worship leaders and performers who were resistant to IEMs become converts the first time they hear the congregation in their ears. It typically costs less than $100 and takes 15 minutes to configure.
How many aux sends does my console need for a full band on IEMs?
One dedicated aux send per performer with a unique monitor mix. A 5-piece worship band all on independent IEMs needs 5 aux sends. Add one more for the pastor if they're on IEMs, and at least one for a dedicated stream or recording mix if you're broadcasting. A 7-member worship team with streaming needs at least 8 aux buses minimum, with more recommended for growth. The Yamaha TF1 has 10, the Allen & Heath SQ-6 has 36, and the Midas M32 has 25, making all three solid choices for IEM-heavy setups. Our digital mixer guide compares bus counts across all five recommended consoles.
Can volunteers learn to set up and run a wireless IEM system?
Yes, and both the Shure PSM 300 and Sennheiser EW IEM G4 are built specifically with simplified volunteer operation in mind. One-touch infrared sync, auto-scan frequency management, and clear front-panel displays reduce technical complexity significantly. The key is a documented runsheet that captures all frequencies, gain settings, and bus assignments so any trained volunteer can replicate the setup correctly each week. The initial setup should always be done by a knowledgeable engineer; the weekly operation is entirely manageable by a capable volunteer with good documentation.
What causes dropouts in a wireless IEM system?
The most common causes are RF interference from other wireless systems operating on nearby frequencies, poor antenna placement that creates line-of-sight obstructions between the transmitter and bodypack, low batteries in the bodypack, or an assigned frequency that's shared with a local TV broadcast or other fixed-frequency transmitter in your area. Start troubleshooting by confirming your frequency isn't conflicting with another active system, then check antenna orientation and placement, then test with fresh batteries. If dropouts persist, re-run the frequency scan with all active wireless gear in the room and reassign to a cleaner frequency.
Shure PSM 300 or Sennheiser EW IEM G4: which is easier to set up?
Both are straightforward to set up, but the Shure PSM 300 has a slight edge for first-time users and volunteer-run booths. The one-touch frequency scan and sync, combined with MixMode's ability to blend two console inputs at the bodypack, reduces the number of decisions a less experienced operator needs to make. The Sennheiser EW IEM G4 has a slightly busier menu structure but offers more RF tuning flexibility and the ability to sync up to 12 bodypacks from a single transmitter, which makes it faster for larger multi-channel rollouts. Both systems include thorough documentation and have extensive community support resources online.
How fast can SoundPro ship wireless IEM systems?
In-stock items ship same day on orders placed before 4:00 PM CST. For complete multi-channel IEM builds, custom quotes, or items with manufacturer lead time, SoundPro's Account Managers can confirm availability and map out a delivery timeline. If you're planning an install before a fall series launch, reach out now. Wireless system components can have lead times during peak season, and building in extra time protects your install window.


